In
today’s society people are very dependant on their cars. A lot of times if your car fails it can be anywhere from hard
to nearly impossible to get around. That is why it is so important to give your car routine maintenance and diagnostic check
ups every so often. Not taking these precautions could end up leading to a hefty mechanic bill and a whole lot of stress you
may not be prepared for.
|
|
| Not doing routine maintenance you can really get caught with your pants down!!! |
You should use this same train of thought when it comes
to your body. The most maintenance a lot of people have is going to see a doctor
every one to two years for a physical. Your car probably gets four to six times that attention a year in just oil changes.
If you happen to “pass” said physical the doc will say “See you in a year or two!” Let’s be
honest though routine physicals are not very in depth. Even most aches and pains are chalked up to “just getting older”
To top it off most physicals don’t really examine fitness levels, flexibility issues or muscle imbalances. Even bodyweight
standards at a physical are typically based on a general BMI that really has no application to bodybuilders, fitness athletes,
or heavily muscled sports athletes. So how do you get more in tune with your body on a regular basis? How about running some
of your own diagnostic test?
What does running your own diagnostics mean?
Running your own diagnostic test simply means doing a few simple tests on yourself to see how everything
is working. This is especially important in the fitness community where the goal is always to be performing at your best and
running optimally and in balance. The problem is a lot of times we don’t run optimally and don’t even realize
it. When the body is not in balance a few things happen:
·
Your athletic ability diminishes.
·
The wrong muscles start to do more of the work
·
You start to develop constant pain by the wrong muscles getting
stronger
·
You become more susceptible to injury
·
You get injured and do not know why
A lot of aches and pains have a direct relation of certain
muscles do work for other muscles that are not fully functioning. A lot of times the aches, pains, injuries, and performance
issues we have, could have been detected earlier or can be alleviated with a few diagnostic test.
What are the main areas of your machine to check?
Now that we talked a little about testing, what exactly should we be testing? If your really want
to do a diagnostic on yourself you definitely want to test the posterior chain, the anterior chain (the core), and the shoulder
girdle. These three areas contribute to more flexibility and function than any other areas in the body. When these areas are not in balance, they also contribute to more injuries and loss of ability than any
other areas in the body. Strained rotator cuffs, pulled hamstrings, lower back
problems, knee injuries, groin pulls, bicep tendonitis, quad strains, and frozen shoulders are just a few of the problems
that can result when these areas are not working optimally.
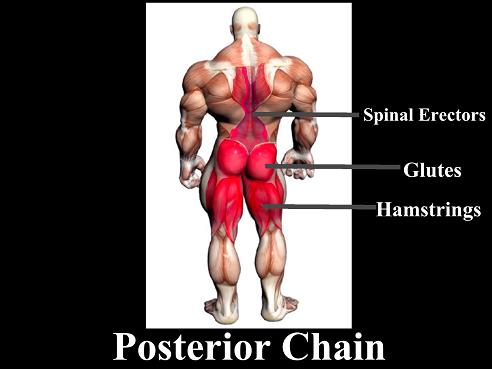
Posterior Chain Diagnostics-
The posterior chain is made up of a group of muscles, tendons, and ligaments that make up the backside
of the body. The glutes, hamstrings, lower back, traps and spinal erectors make up the big muscles of the posterior chain.
Posterior Chain strength is important for everything from hip mobility to sprinting.
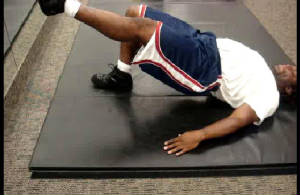
Glute BridgeTest:
The Glute Bridge Test test the strength and endurance of the glute muscles. The glutes are some of
the most important muscles in the body but also probably the most underutilized and under used. Glute activation is important
because it results in stronger leg lifts, faster sprints, higher jumps, and more lower body mobility. Inactive glutes forces
your lower back and hamstrings to do more work resulting in less productivity and increased risk of injury.
How to perform the test:
·
Lay on your back with your back &
heels on the floor. Knees bent at 90°. Lift one leg in the air and hold it straight out. Curl your toes up. Lift your hips
by squeezing your glutes until your body is straight from knees to shoulders. Hold for 5 seconds, come back down, repeat for
20 repsand switch legs.
·
Don’t Use Your Lower Back. Push your lower back against
the floor by tilting your pelvis back. Get off the floor by squeezing your glutes hard.
·
Don’t Use Your Hamstrings. Cramps in your hamstrings
means you’re not using your glutes. Squeeze your glutes as hard as you can.
Results:
If your glutes feel nice and tight you passed.
You need glute activation if your hamstrings feel more tight than your glutes or if you can not perform
the 20 reps.
Extra glute work is always a good thing so even if you passed it would not hurt to perform so extra
glute work.
Movements to work on your glute activation:
Barbell Glute
Bridges, Hip Thrust,
Single Leg Squats
_________________________________________________
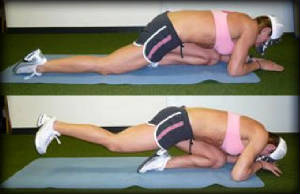
Straight Leg Hip Extension Test:
The straight leg hip extension is a great test for measuring glute activation from a straight leg
position. Movements like stiff leg deadlifts, straight leg deadlifts, and good mornings use similar activation.
How to perform the test:
· Begin on your elbows, with one leg fully flexed at the hip and the knee. This leg should be tucked
up as far as possible into your body with your thigh in contact with your ribs.
· The other leg should be extended straight back behind you and resting
on the floor. The extended leg is the one that's going to be doing the testing. Lift your extended leg off the ground as high
as possible.
·
Be sure to keep that leg fairly
straight and avoid bending it. A slight bend is okay.
·
Additionally, do not allow your
ribs to loose contact with your thigh on the opposite side.
Results:
If you can lift your extended thigh and knee at least one to two inches off the floor
without struggling, you pass.
If you cannot lift your rear leg without shifting your body or deviating from the starting
position, or you find yourself struggling to do so, you have some work ahead of you.
Movements to work on your straight leg glute activation:
Stiff Leg Deadlifts, Romanian Deadlifts, Stiff Leg Good
Mornings, Straight Leg Hip Extension Lifts
_______________________________________________________
Isometric Back Strength Test:
This test measures back strength and endurance. This is important to
prevent possible lower back pain, hamstring injuries, and knee pain all possibly due to an overworked lower back. Some studies
have shown a direct relationship between lower back endurance and risk of back pain.
How to perform the test:
Lay face down on a bench, with your upper
body from the waist up hanging over the end of the bench. Make sure your feet are held or strapped down, and the arms by their
side or clasped behind the head. When ready, bring your body up to the horizontal position, and hold this for one minute.
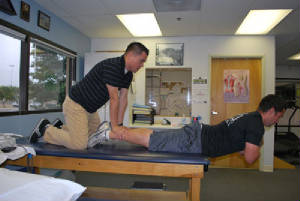
Results:
If you can hold your arch for at least a minute your in good shape but
may still need some work.
Movements to work on your lower back strength:
Good Mornings (most variations), Isometric Back Holds, Hip Pull Thrus
_________________________________________________
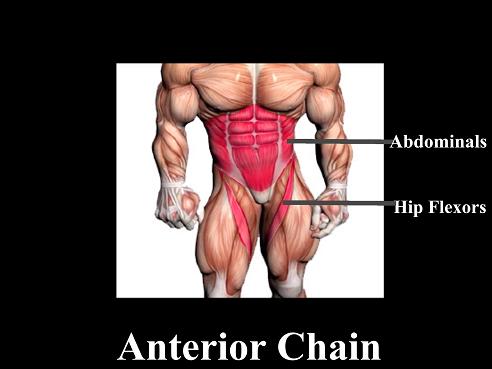
Anterior Chain "Core" Diagnostics
The anterior chain is made up of the muscles tendons and ligaments that
make up the front side of the body. When it come to the anterior chain, think of the "core" muscles, the abdominals and hip
flexors. When the core is weak, a lot of hip problem, lower back problems, and pelvic tilt problems can occur.
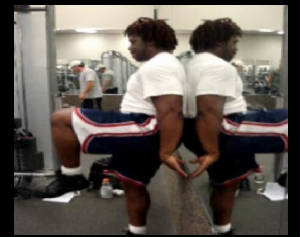
Hip Flexor Strength Test
This test is to measure the strength of your psoas (major
hip flexor). If your psoas is not strong or your hip flexors are tight, mobility becomes a problem, When your hip
flexors are tight it puts you at risk for lower back, hip, knee, and hamstring pains.
How to perform the test:
·
Stand upright with your back to a wall, feet together, heels three inches from the wall, back of head
touching the wall
·
Lift one of your thighs as high as it will go until it is above horizontal (at the least horizontal)
·
Hold this position for 30 seconds then dothe same with the other leg
Results
If
you could hold your thigh above horizontal the whole time, your psoas is not too weak. Just because your psoas isn't weak
doesn't mean you can't benefit from strengthening you psoas and your hip flexors more generally, however.
If your thigh
drops below horizontal before 30 seconds has passed, the psoas on the side of the thigh that was raised is weaker than optimal,
and you should consider strengthening it.
Movements
to improve hip flexor strength:
Barbell
Step Ups, Weighted Hip Flexor Curls, Weighted Knee Ups
__________________________________________________
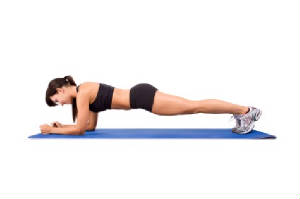
Abdominal Plank Test
This test is to measure the endurance and stability of the abdominal wall and "core" muscles.
How to perform the test:
·
Get down on the ground in "plank"
exercise position. This means elbows on the ground and your body raised up on your toes
·
Hold this position for 60 seconds
·
raise your right arm off of
the ground and then hold that position for 15 seconds
·
return your right arm to the
ground and do the same thing with the left arm for 15 seconds.
·
return your left arm to the
ground and now raise your right leg off of the ground for 15 seconds
·
return your right leg and then
repeat the motion with the left leg for 15 seconds
·
Return your left leg to the
ground and now raise your right leg and left arm for 15 seconds
·
Return your right leg and left
arm and now do the same with the left leg and right arm for 15 seconds
·
Return to the plank position
and hold it for 30 second
Results
If you can complete the test fully you have good core strength. If you
can not complete the test, your core strength needs improvement.
Movements to improve abdominal strength:
Reverse crunches, isometric plank holds, barbell jackknifes
__________________________________________________
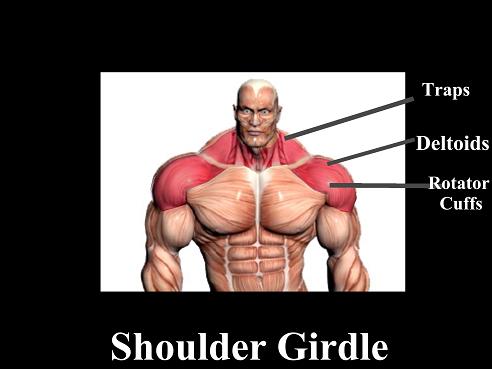
Shoulder Girdle Diagnostics
The shoulder girdle consists of several tiny joints that connect the upper limbs to the rest of the
body and gives a wide range of motion. When the shoulder girdle becomes negatively affected, range of motion and mobility
becomes limited and sometimes painful in the upper body. The shoulders are asked to do a lot for upper body movement so overuse
injuries or rotator cuff injuries are fairly common.
Rotator Cuff Endurance
Test
This test looks at the endurance strength of the rotator cuffs. The rotator cuffs do a lot of work
and often get damaged from overuse and not having enough endurance. Throwing
and heavy pressing movements especially stress the rotator cuffs. Not only should the rotator cuffs be strong but should have
endurance.
How to perform the test:
- Sit on a bench or chair with a pair of 5 pound
dumbbells
- Lift your arms up so that your arm is 90 degrees
from the ground, bend at the elbow so it is also 90 degrees ( so you are making an “L” with your arms) Your hands
should be up towards the ceiling with a dumbell in each hand.
- With your arms still in the “L”
position slowly rotate your arms forward until the dumbbells are now parallel to the ground.
- Once you are parallel rotate them back so your
hands are once again facing the ceiling.
- Repeat this 25 times in a controlled manner
Results:
If you can complete the test your rotator cuffs are okay.
If your arms got too tired or you could not do the amount of reps you
need to work on your rotator cuff strength.
Movements to improve your rotator
cuff strength:
L Rotators, Bradford Presses, Thumbs Down Lat Raisers
______________________________________________________
Wrapping Up Your Check
Up
In the quest to be bigger, faster, stronger, and more mobile sometimes we overlook the small things.
By overlooking the small things we may not be running optimally when we think we are. A good way to check ourselves out is
to periodically run our own diagnostic test. By running our own diagnostics we can possibly correct some issues we have or
possibly avoid future issues by correcting them before they happen. Just because you may not feel something does not mean
everything is in balance. Good areas to check are the posterior chain, anterior chain, and shoulder girdle. A few simple tests
could not only help prevent an injury before it happens but may also help make you better than you currently are.
|